Adding a schedule to your XForm
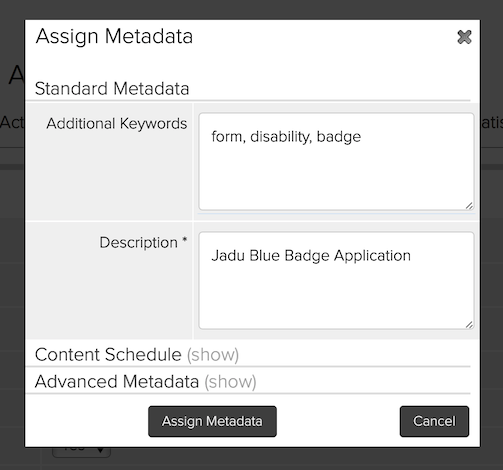
Assign Metadata window
- The Content Schedule area is accessed through the Assign Metadata button.
- The Assign Metadata window contains three main areas; the Standard Metadata area, the Content Schedule area and the Advanced Metadata area.
- Each of the three sections can be hidden or shown by using the hide and show links next to the area titles (you can not show more than one area at a time).
- If you wish to exit the Assign Metadata window, please be aware that any information you have entered will be lost if you have not saved it first by pressing the Assign Metadata button.
- By default when the Assign Metadata window first opens, the Standard Metadata area will be shown. In order to view the Content Schedule area click the show icon next to the section title.
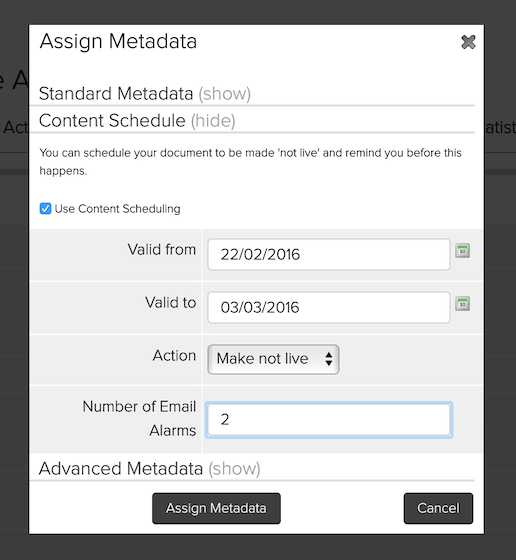
The Content Schedule section of the Metadata window
- If you wish for the form you are creating to be automatically scheduled, make sure the Use Content Scheduling checkbox has been selected.
- In the Valid to field, enter the date that you require your form to expire on (when the action will take place).
- The Action dropdown menu has two options named Make invisible and Make not live. If you choose the Make invisible option, your form will be made invisible from automated navigation when the Valid to date has been reached, but will not be removed from complete access by those who have been provided a link directly to the form.
- If you choose the Make not live option, your form will be removed from all end user access once the Valid to date has been reached.
- The final field named Number of Email Alarms allows you to specify the notification period of your about to expire form. For example if you enter 3 into this field, you will be emailed an expiry notification 3 days before your form is about to expire. You will then be sent a notification 2 days before, 1 day before and the day of the expiry for your form as well.
- Once you have finished entering all your content schedule information, press the Assign Metadata button, and the information you have entered will be saved and the window will close.